E-mail: info@plymachine.com WhatsApp:+8619553901259

Views: 0 Author: Site Editor Publish Time: 2026-09-25 Origin: Site

Lumpy glue batches create a compounding financial impact in industrial manufacturing. They cause uneven spread rates across veneers, leaving dry spots that mimic starved joints and compromise structural integrity. Panels warp under pressure, and delamination occurs frequently at the hot press. Equipment downtime skyrockets as operators clean clogged machinery. While chemical formulation dictates adhesive performance, physical execution drives operational success. Incorrect mixing sequences cause un-dispersed fillers, inadequate agitation leads directly to resin agglomeration, and inconsistent moisture profiles ruin finished panels. Achieving a lump-free, homogenous adhesive mix requires a strict operational sequence paired with purpose-built industrial equipment. This approach shifts the focus from manual troubleshooting to systemic process control. You must control the exact mixing phases, understand the mechanics of agglomeration, and deploy specialized machinery to eliminate these costly defects permanently.
Sequential Precision: The universally accepted baseline for preventing lumps is introducing dry powders (fillers/extenders) into the liquid base (water/solvents) before adding the primary resin, followed by catalysts.
Moisture and Warping Control: Proper mixing prevents dry powder pockets that alter the liquid-to-solid ratio, ensuring consistent moisture distribution to prevent panel warping during the lamination and pressing phases.
Equipment Dependency: Even the perfect mixing order will fail without the correct shear rate and tank geometry provided by a specialized plywood glue mixer.
Production Line Synergy: Integrating automated dosing and mixing equipment directly impacts the efficiency, spread uniformity, and output quality of the entire plywood production line.
A successful glue batch operates as a precisely engineered chemical suspension. It must hit a specific target viscosity, usually measured in centipoise, to flow correctly through the spreader's plumbing. It requires homogenous dispersion of all solid particles to ensure uniform bond strength across the entire veneer sheet. It must maintain an optimal pot life to allow sufficient working time on the factory floor before cross-linking begins. Finally, it must hold the correct moisture content to prevent steam from becoming trapped inside the panel during pressing. A failed batch misses these metrics entirely. It contains undispersed solids, exhibits erratic viscosity, and often cures too quickly in the mixing tank.
Root causes of agglomeration require a close look at physical mechanics on the microscopic level. Lumps form through a specific physical mechanism known as hydration blocking. Operators often make the error of dumping dry extenders directly into viscous resin. Wheat flour, pecan shell flour, macadamia nut shell powder, and various industrial fillers serve as common extenders. These powders often have a fine mesh size, sometimes 200 mesh or smaller. When dumped into a thick, high-viscosity resin, the outside of the powder clump hydrates instantly. This rapid hydration creates a sticky, impermeable polymer shell. The shell completely seals off the dry interior powder from the surrounding liquid. Standard agitator blades cannot easily break this tough outer shell. The lump remains suspended in the mix as a destructive defect, traveling through the pumps and lines until it reaches the application stage.
The impact on downstream operations is severe and compounding. Lumps cause immediate mechanical damage to the grooved rubber rollers on glue spreaders. The spreader utilizes a doctor roll and an applicator roll, separated by a gap measured in thousandths of an inch. Hard agglomerations wedge into this gap and score the rubber surface. This ruins the precision grooves designed to meter the adhesive film. Lumps also create localized weak spots in the veneers. The spreader cannot apply a uniform film over a lump, leaving adjacent areas completely starved of adhesive. Uneven glue spread forces operators to compensate manually by opening the doctor roll gap. They over-apply adhesive to cover the visible dry spots. This over-application introduces excess water into the veneer assembly. Excess moisture leads to severe warping and causes explosive steam blows during the hot press phase. The entire workflow suffers massive delays, which severely disrupts the overall efficiency of the plywood production line.
Defect Observation | Primary Root Cause | Mechanical Consequence | Process Solution |
|---|---|---|---|
Suspended Lumps (Fish-eyes) | Dumping powders directly into viscous resin. | Scored applicator rollers and jammed doctor gaps. | Add dry powders to water first to form a slurry. |
Premature Curing in Tank | Excessive friction heat from over-shearing. | Solidified tank contents requiring manual chiseling. | Reduce agitation speed during the resin phase. |
Erratic Viscosity Spikes | Inaccurate manual measuring of liquids. | Pump cavitation and uneven film thickness. | Standardize liquid volume inputs strictly via load cells. |
Unmixed Powder in Corners | Flat-bottom tank creating dead zones. | Inconsistent solid-to-liquid ratio in final panels. | Switch to a conical tank design with internal baffles. |
Standard operating procedures dictate a strict, non-negotiable sequence for batching adhesives. This applies equally to urea-formaldehyde (UF) and phenol-formaldehyde (PF) resins. You must follow these phases meticulously to prevent agglomeration and ensure a smooth, pumpable mixture.
You must start with precisely measured water or liquid solvents. Never guess or estimate the liquid volume using uncalibrated buckets. Exact measurements avoid introducing excess moisture into the batch. Excess moisture directly causes post-lamination warping and extends pressing times, slowing down the entire plant. Once the liquid is measured and resting in the tank, gradually introduce the dry extenders and fillers. You must do this under continuous, high-speed agitation. Gradual introduction prevents the powder from clumping upon impact with the liquid surface. It ensures complete, uniform hydration of every single particle. The extenders must form a smooth, homogenous slurry. You must verify this visual cue before proceeding to the next step. If you see dry powder floating on top, the shear rate is too low or the addition rate was too fast.
You add the primary liquid resin only after the slurry is perfectly smooth and free of any visible dry pockets. Introducing the resin changes the fluid dynamics entirely. The viscosity of the batch will increase rapidly as the heavy resin blends with the extended water slurry. You must adjust the agitation speed during this phase. The mixer must handle the increasing mechanical resistance without stalling. However, you must avoid over-shearing the polymer chains. Excessive shear at this stage degrades the resin structure. It generates unnecessary friction heat and permanently reduces the final adhesive strength of the glue line. Operators should lower the RPM of the mixing shaft once the resin is fully incorporated.
You must add hardeners and catalysts last. Introduce them immediately prior to application on the veneer. For UF resins, ammonium chloride or similar acidic catalysts are common. This precise timing manages the pot life of the adhesive. It prevents premature cross-linking from occurring inside the mixing tank. Premature curing mimics the physical appearance of lumping, but it is far worse. It ruins the entire batch instantly. It also requires extensive, labor-intensive cleaning to chisel cured resin out of the tank, the pumps, and the delivery lines. Always ensure the catalyst is dispersed evenly with a short burst of moderate agitation before sending the batch to the spreader.
Verify the tank is completely clean and the discharge valve is closed tightly.
Meter the exact volume of water into the tank based on the specific formulation sheet.
Engage the agitator at high speed (e.g., 1500 RPM for a Cowles blade).
Slowly sift the dry extenders into the vortex, allowing each scoop to wet out completely.
Maintain high shear until the mixture becomes a smooth, lump-free slurry.
Reduce the agitator speed to a moderate level (e.g., 300-500 RPM).
Pump the liquid UF or PF resin into the slurry and blend until uniform in color and texture.
Add the required catalyst just before discharging the batch to the spreader holding tank.
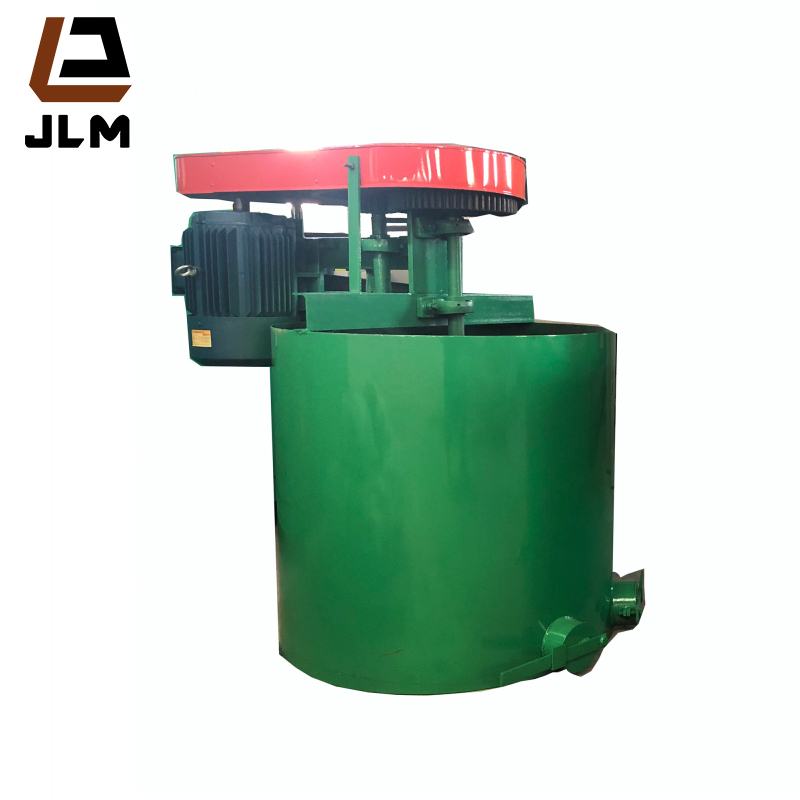
Transitioning from a theoretical process to practical technology requires specific hardware. Executing this mixing sequence at an industrial scale demands specialized Auxiliary Machinery for Plywood. Standard, low-cost agitators will fail to provide the necessary mechanical forces to break down fine mesh powders.
The impeller design dictates your mixing success. High-shear blades, such as Cowles disperser discs, are absolutely necessary for breaking down dry extenders. These blades feature sharp, saw-like teeth that create a high-velocity radial flow. They create the intense mechanical force needed to smash early-stage agglomerations and force the liquid into the dry powder. However, variable speed control via a Variable Frequency Drive (VFD) is equally critical for the later stages. You must reduce the shear rate when adding the final resin and catalyst. Over-shearing damages the delicate resin structure and generates excessive friction heat. This heat accelerates the curing process prematurely, drastically reducing your working pot life.
Fluid dynamics depend entirely on the tank shape. Flat-bottom tanks are notorious for creating dead zones in the lower corners. Powders settle in these corners and avoid the impeller entirely, resulting in a weak, resin-heavy mix at the top and a sludge at the bottom. Conical tanks solve this by funneling the mixture directly into the impeller path. Gravity assists the mixing process, ensuring all material passes through the high-shear zone. Baffles are essential internal structures welded vertically to the tank walls. They prevent the fluid from simply spinning in a useless, solid-body vortex. Baffles disrupt the circular flow and force the liquid back into the turbulent center of the tank. This eliminates the dead zones where unmixed powders typically accumulate and ensures a homogenous blend from top to bottom.
You must evaluate the features that directly influence production value and panel quality. Investing in a high-quality glue mixing machine for plywood provides several critical operational advantages that manual setups cannot match.
Manual batching relies heavily on human accuracy, attention, and physical stamina. It often leads to inconsistent water-to-solid ratios between different shifts or different operators. Load cells and Programmable Logic Controller (PLC) dosing systems eliminate this human error completely. Load cells mount under the tank legs and weigh the vessel continuously. The PLC reads this weight and opens pneumatic valves to introduce ingredients automatically. It shuts the valve exactly at the target weight. They ensure exact measurements for every single batch. This consistency directly prevents panel warping caused by moisture variations. PLCs also control the exact timing of ingredient introduction. They prevent operators from dumping powders too quickly, forcing the machine to follow the strict Water -> Extender -> Resin sequence.
Mixing inherently generates friction heat, especially when using high-shear blades on thick slurries. Furthermore, resin chemical reactions are exothermic, meaning they release their own heat as they blend. Water-jacketed mixing tanks control these rising temperatures effectively. They feature a double-wall construction that circulates cool, chilled water around the exterior of the mixing vessel. This absorbs the excess heat generated by the impeller and the chemicals. It maintains a consistent, workable viscosity regardless of ambient plant temperatures. Summer heat waves will no longer ruin your pot life, and winter cold snaps will not cause the resin to become too thick to pump.
Cleaning a mixer between batches is traditionally a labor-intensive, hazardous task requiring operators to scrape the tank walls manually. Automated cleaning cycles drastically reduce this downtime and improve worker safety. High-pressure spray nozzles mount permanently inside the tank roof. They scour the baffles, the tank walls, and the impellers with pressurized water or solvent. This prevents partially cured resin from contaminating subsequent mixes. It keeps the equipment running at peak efficiency and prevents the gradual buildup of hardened glue that eventually destroys the impeller balance.
Mixer Feature | Operational Function | Direct Benefit to Panel Quality |
|---|---|---|
Variable Frequency Drive (VFD) | Allows RPM adjustment during different mixing phases. | Prevents resin degradation and maintains optimal bond strength. |
Load Cell Integration | Weighs ingredients dynamically as they enter the tank. | Ensures exact moisture content, preventing panel warping. |
Water-Jacketed Tank | Circulates coolant to absorb friction and exothermic heat. | Maintains consistent viscosity for uniform spreader application. |
Internal Wall Baffles | Disrupts circular fluid motion to prevent vortexing. | Eliminates dry powder pockets and ensures homogenous spread. |
Upgrading mixing equipment introduces specific implementation risks that you must manage proactively. You must anticipate operator resistance to new technology. Workers often prefer familiar manual methods over automated touchscreens, even if the manual methods produce inferior results. Calibration errors in automated dosing systems can ruin massive batches if left undetected. A load cell that drifts out of calibration will consistently add too much water or too much resin. Integration bottlenecks frequently occur between new, high-capacity mixers and legacy glue spreaders. The pump flow rates must match perfectly to avoid starving the spreader or overflowing the holding tanks.
We recommend rigorous operator training programs before the new equipment arrives. Focus heavily on the chemistry behind the mixing order. Explain the direct consequences of poor mixing on final panel lamination. Show them the scored spreader rollers and the delaminated panels. When operators understand the underlying mechanics, procedural compliance improves dramatically. They stop cutting corners during the batching process because they see how it affects the entire plant.
Suggest a phased integration approach. Conduct rigorous factory acceptance testing (FAT) at the manufacturer's facility before full deployment on your floor. Run dummy batches using your specific flour and water to verify the shear capabilities. Verify that the new mixer communicates seamlessly with the dosing PLCs. Test the positive displacement pump flow rates under load to ensure they match the spreader requirements exactly.
Highlight the absolute importance of preventative maintenance. Establish strict, non-negotiable schedules for inspecting mixer seals, impellers, and dosing valves. Worn impellers lose their sharp edges and their critical shear capability over time, leading to a gradual return of lumping issues. Leaking pneumatic valves disrupt the delicate water-to-solid ratio by dripping extra water into the tank after the cycle ends. Regular maintenance prevents catastrophic batch failures and keeps your line running smoothly shift after shift.
Audit your current batching standard operating procedures immediately to verify the exact sequence of ingredient introduction on the floor. Evaluate your existing mixer's shear capabilities by inspecting the impeller blades for wear and checking the tank corners for dead zones. Implement weekly load cell calibration checks on all automated dosing systems using certified test weights. Request technical consultations or equipment demos from specialized machinery manufacturers to assess the feasibility of upgrading your current mixing infrastructure.
A: The correct sequence begins with measuring the water or liquid solvent. Next, gradually add dry extenders and fillers under continuous high-shear agitation. Once a smooth slurry forms, introduce the liquid urea-formaldehyde (UF) resin at a lower agitation speed. Finally, add the catalyst or hardener immediately before application to manage pot life.
A: Clumping occurs when dry powders are added directly to highly viscous liquids without proper shear. The liquid rapidly hydrates the outside of the powder mass, forming a sticky, impermeable barrier. This barrier prevents the interior powder from hydrating, resulting in suspended lumps or fish-eyes that ruin the batch.
A: Lumps trap dry powder, altering the intended liquid-to-solid ratio of the adhesive. This creates uneven moisture distribution across the veneer. During the hot press phase, these moisture variations cause localized steam blows and uneven stress, leading directly to panel warping and structural failure.
A: A specialized mixer features specific baffle designs to prevent vortexing and dead zones. It utilizes high-shear impellers designed specifically to break down wood adhesive extenders. It also includes variable speed drives and water-jacketed tanks to handle the increasing viscosity and exothermic reactions unique to wood adhesives.
A: Yes. Programmable Logic Controllers (PLCs) ensure the exact timing and gradual introduction of dry powders. This eliminates the human error of dumping large quantities of ingredients at once. Automated dosing maintains the precise shear-to-volume ratio needed for optimal hydration and prevents agglomeration.
A: The ideal mixing temperature depends on the specific resin formulation, but controlling ambient heat is critical. Water-jacketed tanks circulate cool water to absorb the heat generated by friction and exothermic reactions. This prevents premature curing and viscosity spikes during the mixing phase.